
I still love making pen cases here is my latest commission I went to get the chocolate dye today and when I returned the suede for the interior had arrived.
DSC_0067[1] by my0771, on Flickr
I have a sheet of kydex and my hot air gun so off we go


I still love making pen cases here is my latest commission I went to get the chocolate dye today and when I returned the suede for the interior had arrived.
I have a sheet of kydex and my hot air gun so off we go
Crazyorange (May 17th, 2016), Vera (May 17th, 2016)
Once the components are together it is time to start I heated the Kydex with a heat gun it starts to lift at the edges as it heats up. When ready I used a piece of leather to wrap it around a dowel. The one in the picture below was a little too short so I made another which was fine.
DSC_0070[1] by my0771, on Flickr
The next step was to glue the seam and wrap it in suede.
DSC_0075[1] by my0771, on Flickr
The glue needs to dry before I start on the leather outer cover
Crazyorange (May 17th, 2016), Vera (May 17th, 2016)
Time for the outer cover 2 mm thick veg tanned leather shoulder for those who like extra detail
DSC_0078[1] by my0771, on Flickr
After cutting the edges are square we don't want that so I used an edging tool to remove the edges you might have guessed that eh! anyway a little moisture and a slicking tool and the edges are round and super smooth.
DSC_0084[1] by my0771, on Flickr
Thanks for looking
Michael
Crazyorange (May 18th, 2016), Vera (May 18th, 2016)
Michael,Originally Posted by MY63

Can you give us an estimate of how many hours of work a case like this entails?
Thanks.
Lady Onogaro
"Be yourself--everybody else is already taken." --Oscar Wilde
I have started applying the dye to the leather I cut earlier
DSC_0093[1] by my0771, on Flickr
I sealed up the end of the suede covered tube to stop the wet dye being absorbed into the suede
DSC_0094[1] by my0771, on Flickr
After shaping the leather I removed the plastic cover and glued the leather outer cover in place once it was secured I started to mark the stitching holes as soon as the holes were made I started stitching the case together.
DSC_0096[1] by my0771, on Flickr
DSC_0100[1] by my0771, on Flickr
DSC_0103[1] by my0771, on Flickr
The plan for this case is to reduce the overhang at the end of the stitching so I have stopped the stitching short on the round end.
Hi Lady Onogaro
I have been trying to work that out with this current project it is not easy as sometimes I can only work for ten minutes before I have to stop and other times I can work for an hour.
My best guess is about five hours over two days but sometimes it takes longer. Especially if I don't like the stitching and pull it all out and start again
For anyone who does not know I charge £50 for a single case although I am thinking of asking £40 for the single slip case.
I think is fair for the work and materials involved I think I am safe to discuss this here it is not allowed on other forums.
I have trimmed the bottom piece and then started shaping the top piece
DSC_0104[1] by my0771, on Flickr
After shaping and gluing I followed the same steps as for the bottom piece marking stitching holes and sewing the joint together. After sewing I carried out final shaping.
DSC_0108[1] by my0771, on Flickr
Edges are next
Crazyorange (May 20th, 2016), Mr. Reader (June 1st, 2016), Vera (May 19th, 2016)
More than fair, Michael... The pen case you made for me is one of my prized possessions because of it being a high quality handmade case. It puts a smile on my face each time I pick it up.
Crazyorange (May 20th, 2016), Hawk (May 22nd, 2016), MY63 (May 20th, 2016)
Thanks Dave
I appreciate your feedback and support.
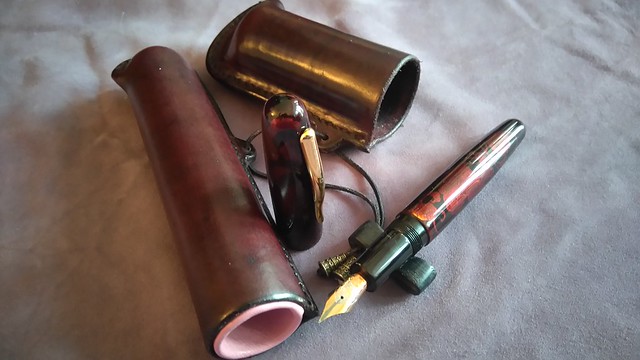
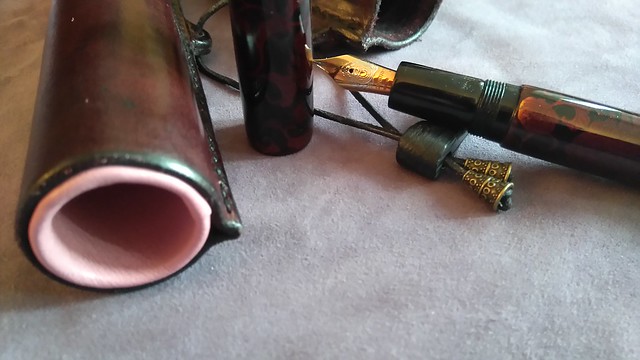
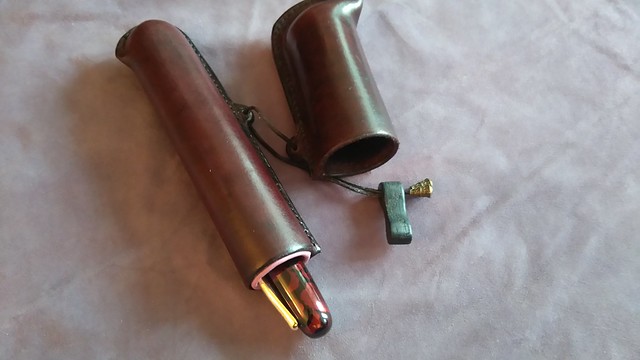
I have just finished the chocolate and orange case and think I might have to readjust the amount of time required to make one as I had forgotten about the wooden toggle and the disc for the initials the sanding and preparation of the edges cutting and dying the thong.
DSC_0018[1] by my0771, on Flickr
DSC_0005[1] by my0771, on Flickr
Crazyorange (May 20th, 2016), Hawk (May 22nd, 2016), Monz (May 21st, 2016), Mr. Reader (June 1st, 2016), rgperedo (May 22nd, 2016), Vera (May 20th, 2016)
The chocolate brown is beautiful.
Mr. Reader (June 1st, 2016), MY63 (May 20th, 2016)
Micheal, your work is always staggering. Well, it makes me stagger, even though I already know, when I open up your posts or blogs, that I am going to see something interesting and possibly gorgeous. (I only say possibly because you are a brave soul who lets us see the things that you are not satisfied with as well - very educational, and kind on your part. The finished objects are all gorgeous.)
MY63 (May 21st, 2016)
The pen case is gorgeous!
Sent from my E6683 using Tapatalk
MY63 (May 21st, 2016)
Yes, it is!
My long range plan is to match my pens, journals, pen cases and my cameras. Right now I have Michael's Ox-blood case matching my Nikon. Journal too. The Nakaya Ake-Tamenuri will take awhile! LOL..
After that, a case for my M205 Pelikan.
MY63 (May 23rd, 2016)
Thanks Scrivelry I really do appreciate your comments. I am still learning about leatherworking and do sometimes make mistakes often because I ignore the lessons I learnt as an apprentice metal worker. Like measure twice cut once
Davegt I look forward to helping you to realise your plan.
I do have a new project to share it is a pen box or might be a pair or desk set I have not fully decided yet. I am not sure if I should start a new thread or just add it here.
Looking forward to your new project. I will find it wherever you post it.
We have met the enemy and he is us.
-Pogo
MY63 (May 24th, 2016)
OK the next project is a pair of boxes or a pair of boxes sitting on a plinth to make a desk set. This idea came from an inkwell that was given to Tracy Lee or legally inked from Instagram. She had also posted some great pictures from the space centre. I found them very interesting and as I had been looking for something interesting to carve into leather and the idea just grew from there.
I printed the two images out and used some blank boxes I had made but never used.
DSC_0041[1] by my0771, on Flickr
The next step was to cut two leather panels out of the thickest leather I had available which is about 4mm thick
DSC_0057 by my0771, on Flickr
After soaking the leather in cold water I used a pointed modelling tool to trace the outline of the image onto the leather after tracing I cut the lines into the leather with a special knife called a swivel knife.
DSC_0060 by my0771, on Flickr
DSC_0061 by my0771, on Flickr
After finishing the carving I left the panels to one side on a flat surface to dry out for 24 hours.
DSC_0063 by my0771, on Flickr
So far so good however I don't like the results and my blank boxes are not both symmetrical and I don't like that either so I am going to make two new boxes and I am considering other methods of replicating the images on the top possibly veneer
Thanks for looking
Michael
Last edited by MY63; May 26th, 2016 at 12:28 PM.
Crazyorange (May 28th, 2016), Mr. Reader (June 1st, 2016)
I was not too happy with the carving so I decided to return to veneer and see if it would give a better result I have made veneered boxes before but never something this complex.
Starting with about six copies of the printed image I cut pieces to fit
DSC_0079[1] by my0771, on Flickr
Red stripe and white letters
DSC_0082[1] by my0771, on Flickr
The loop is made from boxwood soaked and bent to shape finally waste paper was trimmed away
DSC_0089[1] by my0771, on Flickr
All of the gaps between the letters were then filled with black veneer the logo was then taped to the background
DSC_0092[1] by my0771, on Flickr
Then cut around the outline and remove the waste from the back which allowed the veneer to lie flush. This takes forever to do I now know why I don't make veneered boxes anymore.
DSC_0093[1] by my0771, on Flickr
This is the back with all of the waste removed ready to be glued to the top of the box
I am not able to make the boxes at the moment but we will come back to this soon.
Last edited by MY63; June 4th, 2016 at 01:38 AM.
Crazyorange (June 4th, 2016), Mr. Reader (June 4th, 2016)
The next stage is to add the veneer to a box these boxes are made as four sides a top and a bottom and then cut in half to make the box.
Everything will become clear as we proceed.
DSC_0153[1] by my0771, on Flickr
Removing the masking tape once the glue had dried. Very carefully
DSC_0159[1] by my0771, on Flickr
The image is not perfect letters are very difficult to make in veneer
DSC_0161[1] by my0771, on Flickr
The edge of the box did not look right so I trimmed the veneer back and added a border of premade banding
DSC_0163[1] by my0771, on Flickr
I have veneered all around the box and it is ready to be cut in half the best way to do this is on a table saw or a band saw as I don't have either I will cut it by hand.
Crazyorange (June 7th, 2016)
I have not shared one of these cases for a little while as I thought people might be getting a little sick of them
So here is the flat piece of kydex cut from a large sheet.
DSC_0547[1] by my0771, on Flickr
Heated and rolled around a piece of dowel using a scrap piece of leather.
DSC_0549[1] by my0771, on Flickr
Seam glued and sanded.
DSC_0554[1] by my0771, on Flickr
I cut a strip of red suede and stitched the bottom over a rounded dowel which was then glued into the kydex tube
DSC_0557[1] by my0771, on Flickr
This is the finished inner core of one of my pen cases
DSC_0559[1] by my0771, on Flickr
Thanks for looking
Michael
Crazyorange (July 17th, 2016), Hawk (July 15th, 2016), Laura N (July 15th, 2016), mrcharlie (July 20th, 2016), writingrav (July 16th, 2016)
Once the inner liner was finished I started on the outer leather cover.
After cutting to size and soaking the leather I started to form the shape.
DSC_0583[1] by my0771, on Flickr
The inner liner has been wrapped in shrink wrap to protect it during the forming process.
Time to apply some dye.
DSC_0587[1] by my0771, on Flickr
Before the dye has dried out and when I was happy with the shape I added some glue and inserted the liner applying pressure from my clamp.
DSC_0591[1] by my0771, on Flickr
Stitching holes marked with a pricking iron the rest of the hole is made with an awl.
DSC_0601[1] by my0771, on Flickr
Stitching complete
DSC_0603[1] by my0771, on Flickr
After the lower body was sewn I started the upper part which had been waiting in a plastic bag to prevent it from drying out.
DSC_0608[1] by my0771, on Flickr
After sewing the upper part I started preparing the edges trimming sanding and shaping the final part is dying and sealing with pure beeswax.
DSC_0612[1] by my0771, on Flickr
While dying the edges I managed to get some dye onto the thread so I cut it all out and re stitched the case.
Crazyorange (July 23rd, 2016), mrcharlie (July 23rd, 2016)
 Posting Permissions

 Reply With Quote
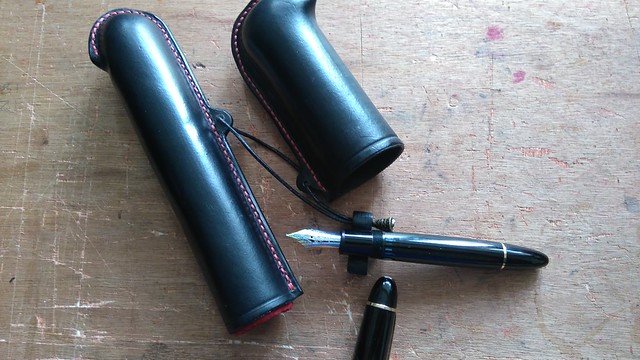
Bookmarks